“How to install Cloudsim?” or “How to setup Cloudsim?” is the first question that comes to your mind when you come to know about it. And, when you look at the various links and forums, Does it looks a bit tricky?
DO NOT WORRY, the Cloudsim simulation toolkit setup or you can say the installation of cloudsim is very easy. This Cloudsim tutorial is going to take you on a step-by-step journey.
Now before you start to setup CloudSim, the following resources must be Installed/downloaded on the local system
Cloudsim simulation toolkit setup is easy. Before you start to set up CloudSim, the following resources must be Installed/downloaded on the local system
- Java Development Kit(JDK): As the Cloudsim simulation toolkit is a class library written in the Java programming language, therefore, the latest version of Java(JDK) should be installed on your machine, which can be downloaded from Oracles Java portal. For assistance in the installation process, detailed documentation is provided by Oracle itself and you may follow the installation instructions
- Eclipse IDE for Java developers: As per your current installed operating system(Linux/Windows). Before you download make sure to check if the 32-bit or 64-bit version is applicable to your Computer machine. The link for the Eclipse Kepler version is available at the following link
- Download CloudSim source code: To date, various versions of CloudSim are released the latest version is 5.0, which is based on a container-based engine. Whereas to keep the setup simple for beginners we will be setting up the most used version i.e. 3.0.3, which can be directly downloaded by clicking on any of the following: Click for Windows or click for Linux.
- One external requirement of Cloudsim i.e. common jar package of math-related functions is to be downloaded from the Apache website or you may directly download it by clicking here.
- Unzip Eclipse, Cloudsim, and Common Math libraries to some common folder.
Note: Installation steps are almost similar for Windows as well as Linux computer system.
Let’s Get Started to answer the “How to install Cloudsim?”
First of all, navigate to the folder where you have unzipped the Eclipse folder and open Eclipse.exe

Now within Eclipse window navigate the menu: File -> New -> Project, to open the new project wizard

A ‘New Project‘ wizard should open. There are a number of options displayed and you have to find & select the ‘Java Project‘ option, once done Click ‘Next‘

Now a detailed new project window will open, here you will provide the project name and the path of the CloudSim project source code, which will be done as follows:
- Project Name: CloudSim.

- Unselect the ‘Use default location’ option and then click on ‘Browse’ to open the path where you have unzipped the Cloudsim project and finally click Next to set project settings.

Make sure you navigate the path till you can see the bin, docs, examples, etc folder in the navigation plane.
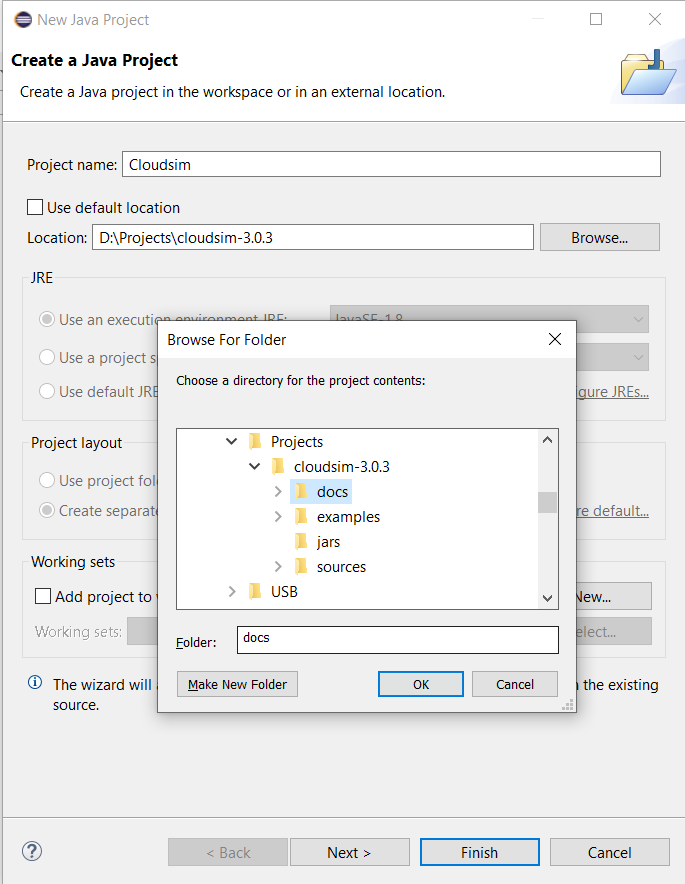
Once done finally, click ‘Next’ to go to the next step i.e. setting up of project settings

Now open the ‘Libraries’ tab and if you do not find commons-math3-3.x.jar (here ‘x’ means the minor version release of the library which could be 2 or greater) in the list then simply click on ‘Add External Jar’ (commons-math3-3.x.jar will be included in the project from this step)
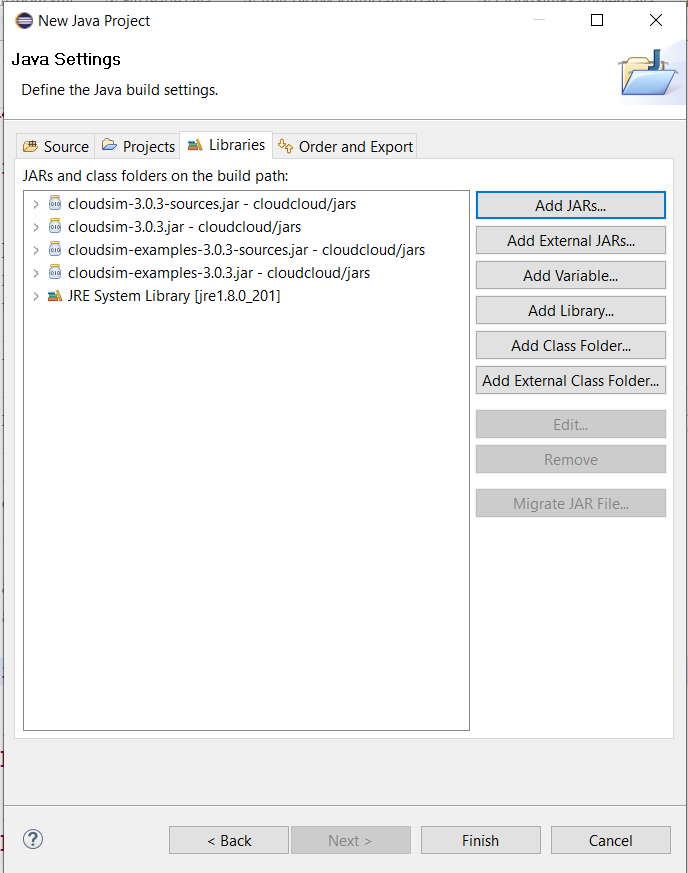
Once you have clicked on ‘Add External JAR’s‘ Open the path where you have unzipped the commons-math binaries and select ‘Commons-math3-3.x.jar’ and click on Open.

Ensure the external jar that you opened in the previous step is displayed in the list and then click on ‘Finish’ (your system may take 2-3 minutes to configure the project)

Once the project is configured you can open ‘Project Explorer’ and start exploring the Cloudsim project. Also for the first time eclipse automatically start building the workspace for the newly configured Cloudsim project, which may take some time depending on the configuration of the computer system.
The final screen will appear after Cloudsim is configured.
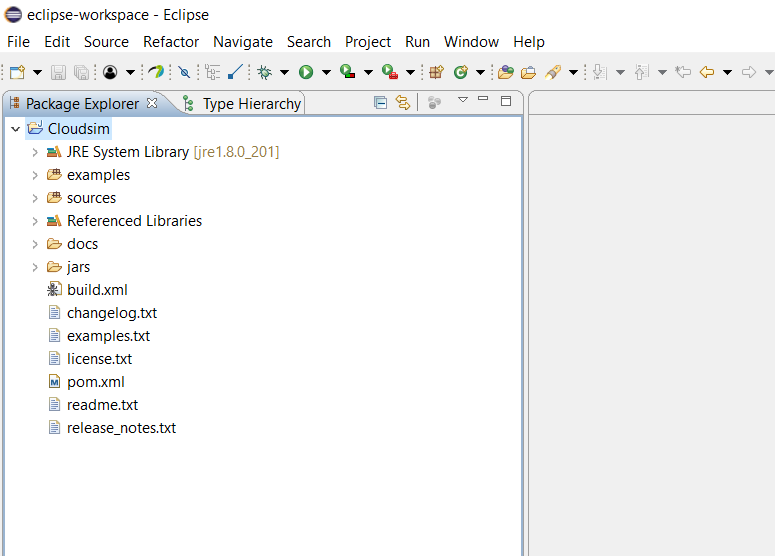
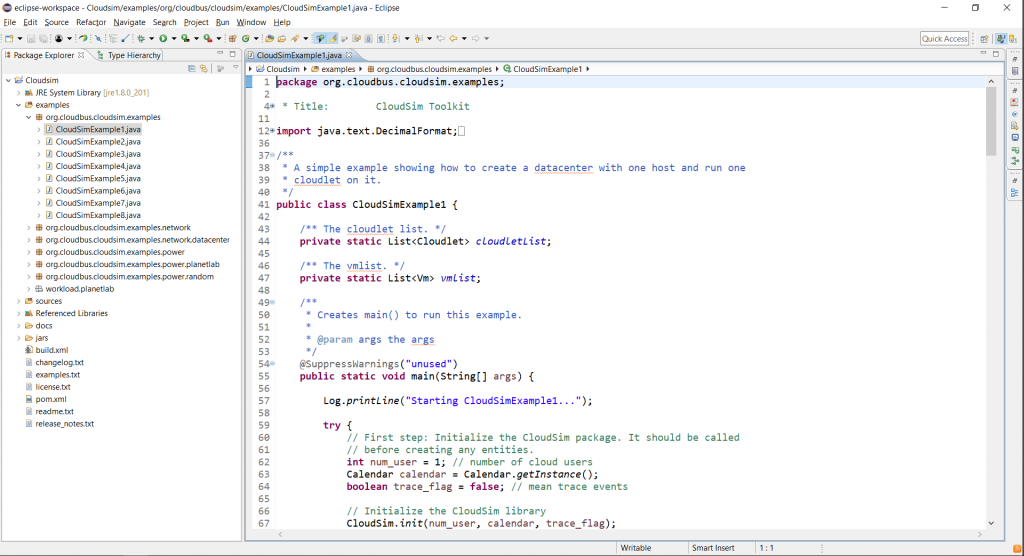
Now just to check you within the ‘Project Explorer‘, you should navigate to the ‘examples‘ folder, then expand the package ‘org.cloudbus.cloudsim.examples‘ and double click to open the ‘CloudsimExample1.java‘.
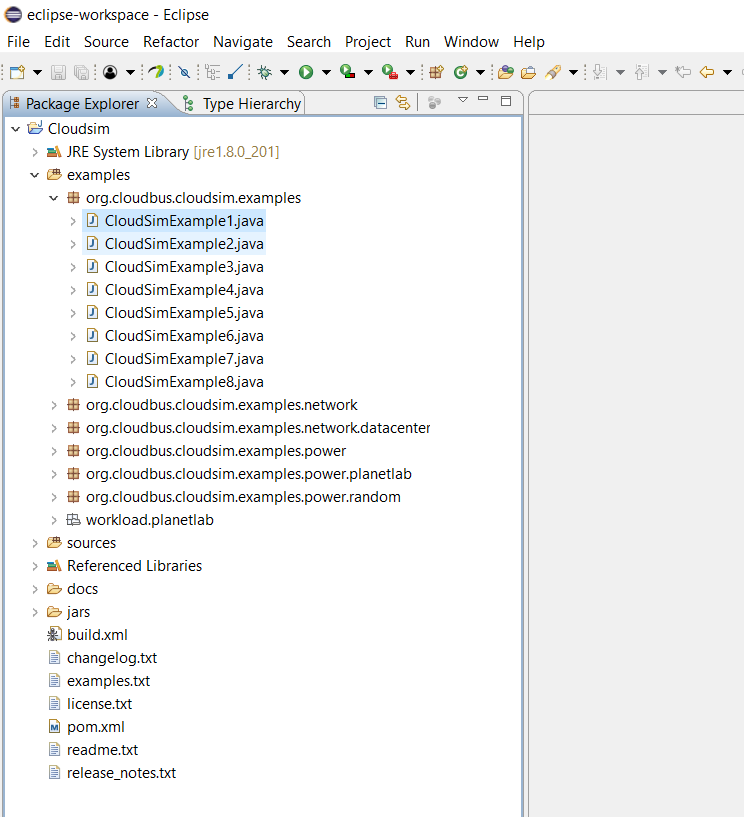
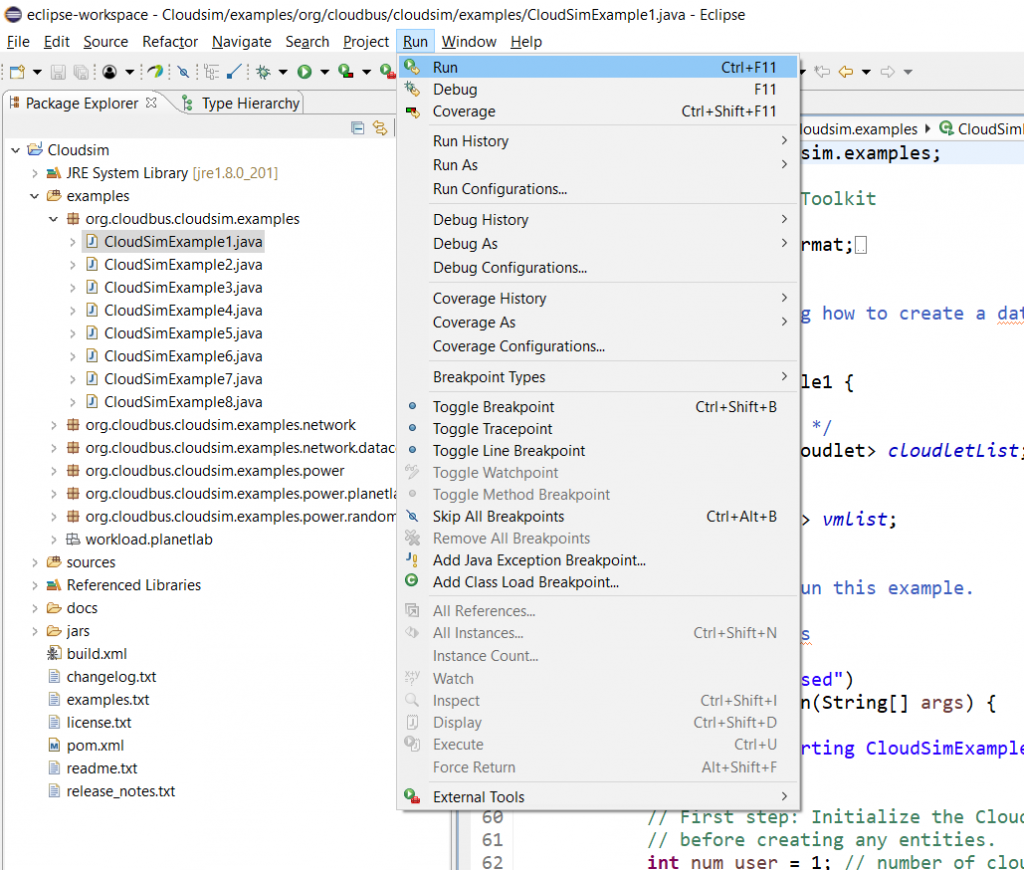
Now navigate to the Eclipse menu ‘Run -> Run‘ or directly use a keyboard shortcut ‘Ctrl + F11’ to execute the ‘CloudsimExample1.java‘.
if it is successfully executed it should be displaying the following type to output in the console window of the Eclipse IDE.
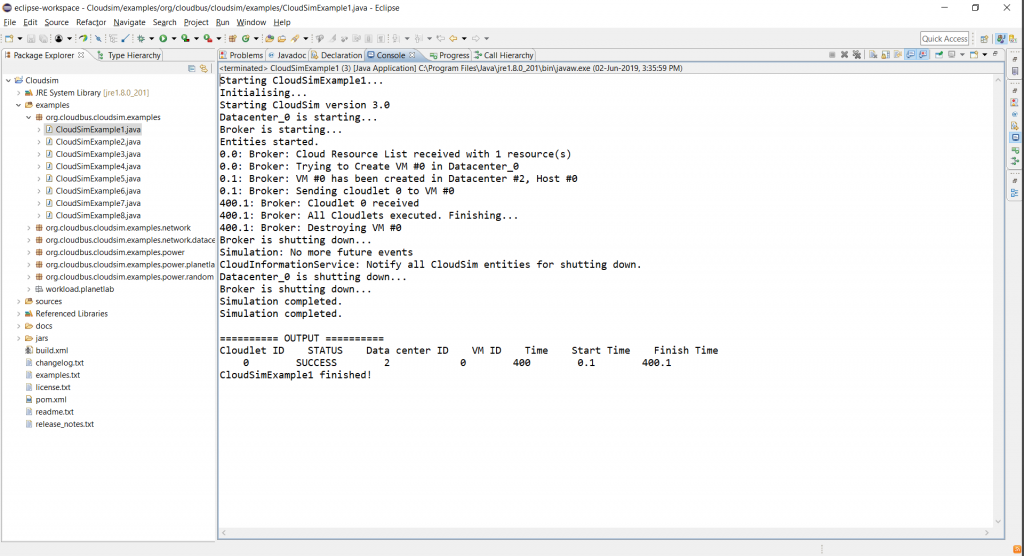
If Yes then Congratulations!!
Now you have successfully set up/Installed the CloudSim Simulation Toolkit on your computer machine and you are ready to start with the experimentation for your further research work.
For more insight into the class hierarchy, you may refer to “CloudSim Simulation Toolkit: An Introduction” and “What is Cloudsim?“.
Also, You may subscribe to an online self-paced course on Udemy named Essential CloudSim Tutorials.
Did you encounter an error during the setup of cloudsim?
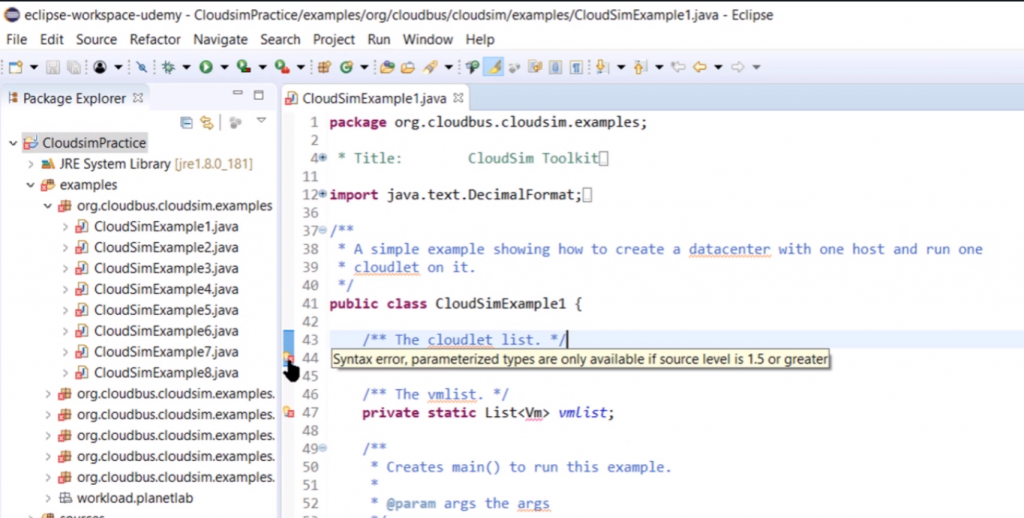
If you have encountered some error then the eclipse may look like this:
Most of the time, the type of error that you may encounter during setting up of the cloudsim in Eclipse should be stating either:
“Syntax error, parameterized types are only available if source level is 1.5 or greater.”
OR
“Syntax error ‘for each’ statements are only available if source level is 1.5 or greater.”
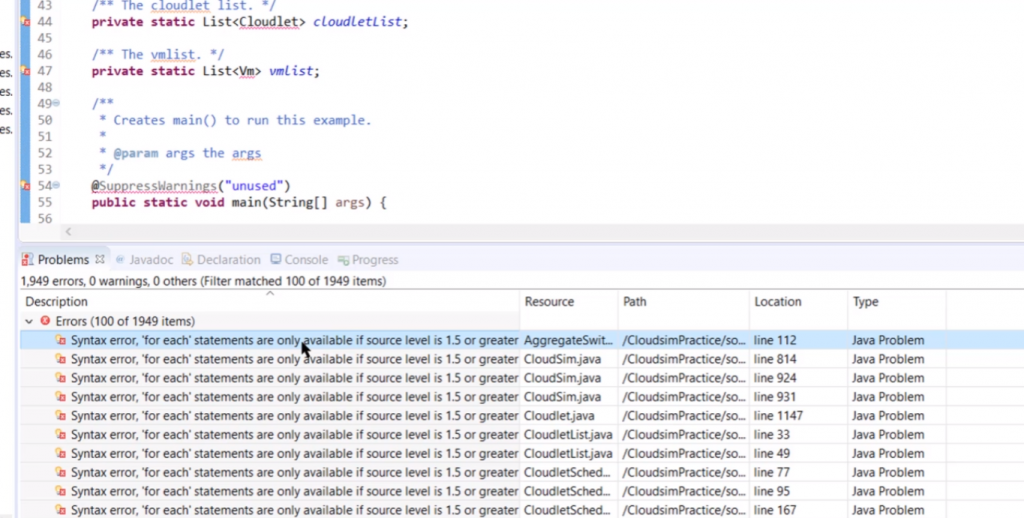
These errors occur due to two reasons:
Case 1: The version of Java installed on your computer system is older than 1.5
Case 2: Your default Java environment for the Eclipse project is not set to the latest Java version which is available on your computer system.
For Case 1, you have to download and install the latest Java version from Oracle/Java website.
For Case 2, you have to do some modifications to the eclipse project, and for this, you should follow these steps:
- In the Eclipse IDE menu, click on ‘Project’ and from the dropped menu list click on ‘Properties’ to open a project properties window.
- On the project properties window, from the list available on the left, select ‘Java Compiler’; this will display the compiler options.
- Now, click on the ‘Enable Project Specific Settings’ checkbox, which further enables the options provided just below the checkbox.
- Now, under the JDK compliance heading, change the ‘Compiler Compliance Level’ to the highest number available on the list.
- Also, make sure “Use default compliance settings” should be in the checked state.
- Now, click on the “Apply and Close” button. A popup alert will appear asking for confirmation to apply the settings. Click ‘Yes.’
Now you will notice that the rebuild process for the project will get started and confirm the error is resolved or not. You may check the error log window or run any example class available in org.cloudbus.cloudsim.examples namespace.
You may also follow the detailed step-by-step demo to “Configure CloudSim using Eclipse IDE”
Hope this article helped you answer your big question on “How to install Cloudsim using Eclipse?“
In case you find this article suitable for your work or you find any difficulty in following the method mentioned above you may feel free to share in the comments section.
I look forward to interacting with you.
Hi,
Thank you for the tutorial. I was able to install both version 3.03 and 4.0. The first example ran as you explained. However there are several errors in the project; example is found under org.cloudbus.cloudsim.examples.container : HelperEx.java. The error is The import com.opencsv cannot be resolved. Are there other libraries we need to install or I didn’t quite unzip it well?
Hello Kunbi, Thanks for sharing your feedback. I hope you have followed this video(https://youtu.be/r38GAwmPmm8) to set up cloudsim 4.0. If not, suggest you go through the same. Otherwise, you may share the stack trace over hello@superwits.com, it might require a bit of investigation.
Regards
Anupinder Singh
Hi, thanks for the tutorial. However, the beginning is so confusing since the link you have provided for downloading the ClousSim for Windows does not have the same subfolders as you present in this tutorial. I think providing the right link and also updating the screenshots of the Eclipse software would help a lot in clarifying this tutorial.
Thanks again.
hello Kim,
I will improve the post accordingly. Thanks for your great feedback and contributing to our community.
Regards
Anupinder
Thank you so much, I look forward to that!
Hey Sir
First of all Thank you for the Installation Guide on Cloudsim with Eclipse. It Really helped a lot! Content was well structured, and all links were provided alongside that further saved my time. Still Installing the things for the first time takes time. I just had a query, all my errors were resolved in the file “CloudSimExample1.java” and i got the required output as well, but still there is a red cross appearing in the file named “module-info.java”.
It’s pointing syntax errors in “.”,= expected. Kindly guide.
Thanks!
Dear,
You can simply delete the file, it is not required for the base cloudsim version.
Hi,
Downloaded all folders
When clicking on eclipse.exe an error encountered and could not proceed further!
” Java was started but returned with exit code=13″
Kindly help me to go further
Thanks
Lavanya
Lavanya, can’t say check the support forum of the eclipse.
Hi, i have no errors in the package explorer, or syntax, but when i try to run an example it stucks to building….. and i cant stop the process. I dont know why, its like something is blocking my project to run or maybe something else. Please answer me as soon as possible, iam in a great hurry. Thanks.
George, the first time build process generally takes 3 to 15 minutes depending on the system configuration. Try to wait for some time, also check the version of JDK it should not be greater than 1.9.
HI SIR
thank you so much for this document. I instill cloudsim as you say but when I try to execute example one , there are many errors and I see in the left window under the examples there across red market on the modular-info.java file and I think it the reason for all the error in the example1
what should I do pleas help me
Dear,
During the cloudsim setup, there might be a pop-up displayed asking your permission to convert the project java requirements to the latest. You might have clicked on yes, whereas you should have clicked on No.
So I suggest you should create a fresh setup of cloudsim.
When I am tring to run cloudsimexample1.java file it shows the launch error that editor does not contain a main type.
thank you for this tutorial , it saves my time after long trip
Thank you very much for giving this tutorial; explained more detailed than my cloud faculty
Do you have an Installation video for CloudSim 6.0